First of all we want to wish you a very HAPPY NEW YEAR! Hope your holidays were joyful.
Before we get into the mystery quilt we want to remind you that tomorrow (Jan. 3) is our fabulous five fifty five first Friday sale. All designated fabrics are only $5.55 per yard. As you know, it is a great way to build your stash or purchase backing fabric. We have added some terrific outdoor flannels to the shelves for the sale.
A little side note - our furnace has gone out and we are hoping it will be repaired today but dress warmly just in case.
We love the way the December mystery quilt turned out.
As is usual for us, the photo doesn't do justice to the quilt. It is much cuter in real life.
This was a fun quilt to create using a stack and whack method. Because it is a little unusual we have decided to do a step by step tutorial.
The pattern includes a cutting diagram. You will need 21 copies of the heart diagram. (You can trace the diagram on 10 x 10 inch freezer paper if you desire. These can be pressed to the fabric to help keep the pattern from shifting.)
Begin by sorting the 10 inch squares into pairs. Make sure that each pair is comprised of contrasting fabrics.
Align the squares with the print side up and the outside edges aligned. Place the cutting diagram on the top of the set with the paper centered (right to left) and the top of the paper aligned with the top of the fabric.
Align a ruler on the line indicating the first cut and cut through the paper and layers of fabric.
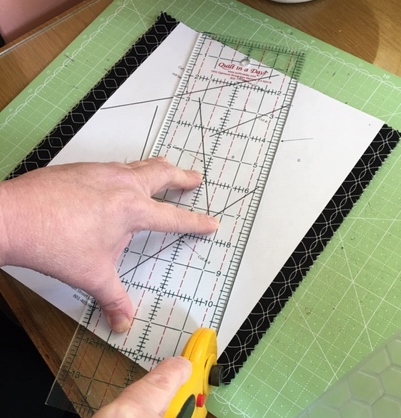
Realign the paper and fabrics and continue to cut in the order indicated on the diagram until all of the cuts are completed. Make sure to leave all of the pieces in relative position to make reassembly easier.
Take fabric pieces B and C from the bottom and place them on top. As you can see, one of the fabrics will become the heart and the other print the background of both blocks.
Use an accurate 1/4 inch seam to begin sewing the pieces together. Start by sewing piece A to piece B. Overlap the ends about 1/4 inch to accommodate the seam allowance. Press each seam as it is sewn. (We found a little best press helps tremendously to keep the seams flat and precise.) Trim each unit if needed before adding the next section.
Sew the A/B section to section C. Align so the bottom point of A/B extends about 1/4 inch past section C as seen in the photo below. Press.
Add section D as shown below. Press back.
Sew on section E and press.
You will need to trim the edge of the sewn unit (as seen below) before sewing section F in place.
Section F is sewn to the unit next.
Section G is sewn on last. (You may need to straighten the edge of the sewn unit before attaching G.) We found it best to place this piece so the smallest part of the wedge hangs below the rest of the block. Press back.
Repeat the process to create a total of 42 blocks. Measure the smallest of your blocks and square all of the blocks to that size. We squared our blocks to measure 8 1/4 x 8 1/4 inches.
Follow the directions with your kit to assemble the blocks and add the border.
Hope this helps. Happy Sewing!
Thursday, January 2, 2020
Friday, December 13, 2019
Second Sat. Sampler block 9
For this block you will need:
8) 4" background squares
8) different 4" prints
Draw a diagonal line on the back of each of the background squares.
Match a background square to each of the print squares with the right sides together and the outside edges aligned. Sew 1/4 inch on each side of the drawn line. Cut on the line. Square each section to 3 1/2 inches and trim the excess points of the seams. Press toward the print.
Assemble the resulting 1/2 square triangles as pictured above to create the block.
Monday, November 25, 2019
November mystery quilt
With this being Thanksgiving week we figured it might be nice to have the mystery kits ready a little early. You are welcome to stop in and pick them up today if you would like.
We kept the quilt fairly simple to show off the beautiful prints in the collection.
We chose to add an optional border which makes the quilt about 67 x 83 1/2 inches.
We will be using the Juniper collection for our December mystery quilt. Since the last Tuesday in December falls on New Years Eve we will pass out the kits on Monday, Dec. 30th.
Thank you for your support. As we take a moment to think of our blessings we count you among them.
The shop will be closed this Thursday through Saturday as we celebrate Thanksgiving and spend a little extra time with our family.
Happy Thanksgiving!
We kept the quilt fairly simple to show off the beautiful prints in the collection.
We chose to add an optional border which makes the quilt about 67 x 83 1/2 inches.
We will be using the Juniper collection for our December mystery quilt. Since the last Tuesday in December falls on New Years Eve we will pass out the kits on Monday, Dec. 30th.
Thank you for your support. As we take a moment to think of our blessings we count you among them.
The shop will be closed this Thursday through Saturday as we celebrate Thanksgiving and spend a little extra time with our family.
Happy Thanksgiving!
Friday, November 8, 2019
Second Sat. Sampler block 8
For this block you will need:
8) 4" background squares
8) different 4" print squares
8) 4" background squares
Draw a diagonal line on the back of all of the 4 inch background squares.
Match each of the background squares with a 4" print square making sure the outside edges are aligned and the right sides are together.
Sew 1/4 inch on each side of the drawn lines. Cut on the line. Square each section to 3 1/2 inches and trim the excess points of the seams. Press toward the print.
Assemble the resulting 1/2 square triangles to create the block as pictured above.
Thursday, October 31, 2019
Happy Halloween!
Hope you are having a spooky good day.
Tomorrow (Nov. 1) is the first Friday of the month. That means we have some scary good savings planned for you. We have added lots of beautiful fabric to the shelves in preparation for the $5.55 sale tomorrow. Come and check them out.
Be safe. We'll see you tomorrow.
Tomorrow (Nov. 1) is the first Friday of the month. That means we have some scary good savings planned for you. We have added lots of beautiful fabric to the shelves in preparation for the $5.55 sale tomorrow. Come and check them out.
Be safe. We'll see you tomorrow.
Tuesday, October 29, 2019
October mystery quilt revealed today
Look at the wonderful quilt Becky made with the Serenade layer cake.
It involves a small amount of simple, raw edge applique and some quick patches. Didn't it turn out cute?
We want to thank all of you who chose to participate. We had great sign ups for this month's quilt.
We liked the quilt so well that we created a Christmas version replacing the flowers with Christmas trees. We have one Christmas kit left and will be happy to pass it on to the first person who requests. (We will be ordering more so don't panic just yet.)
We will be using fabric from the Penny Rose collection "Majestic" for the November mystery quilt. If you like it sign up soon.
Happy Halloween!
It involves a small amount of simple, raw edge applique and some quick patches. Didn't it turn out cute?
We want to thank all of you who chose to participate. We had great sign ups for this month's quilt.
We liked the quilt so well that we created a Christmas version replacing the flowers with Christmas trees. We have one Christmas kit left and will be happy to pass it on to the first person who requests. (We will be ordering more so don't panic just yet.)
We will be using fabric from the Penny Rose collection "Majestic" for the November mystery quilt. If you like it sign up soon.
Happy Halloween!
Wednesday, October 9, 2019
Second Sat. Sampler block 7
We are on the downhill slide. Hope you are enjoying the ride!
For this block you will need:
4) 4" background squares
4) 3 1/2" background squares
4) 4" blue print squares
Draw a diagonal line on the back of each of the 4 inch background squares and two of the red print squares.
Match two of the 4" blue print squares to the red print squares with the diagonal line on the back. Make sure the right sides are together and the outside edges aligned. Match the remaining blue and red 4" print squares with the 4" background squares making sure the outside edges are aligned and the right sides are together.
Sew 1/4 inch on each side of the drawn lines. Cut on the line. Square each section to 3 1/2 inches and trim the excess points of the seams. Press toward the print.
Assemble the resulting 1/2 square triangles to create the star block as pictured above.
Subscribe to:
Posts (Atom)