Pages

Showing posts with label Saturday Sampler blocks. Show all posts

Thursday, January 12, 2017

Finishing instructions for patriotic (buck a block) quilt. (Throw size)


Thanks so much for participating in our Buck- a-block program the last 12 months.  We hope you have enjoyed it.  We are planning another one for 2017 so stay tuned - details will be coming.

Important note:  If you purchased a finishing kit you need to know that we messed up.  (Sorry.) Somehow we didn't calculate the blue fabric needed to border the individual blocks.  Many of you may have something in your stash that will work nicely.  For those who don't we will have an alternate blue available soon.  You will need about 28 inches for the throw size version.  We will be offering this at a discount to those who would like it.  We apologize for the error and appreciate your understanding.

The following finishing instructions are for the throw size version of the quilt.  Some of you opted for a queen size.  Those instructions will be posted separately.  (The process is the same - the cutting amounts are different.)

The blocks you have been sewing through the year should all measure 12½ inches square.

From the blue fabric (not the border fabric) cut 24) 1½” x 12½” strips and 24) 1½” x 14½” strips.

Sew a 12½” strip to opposite sides of each of the 12 blocks and press.  Sew the 14½” strips to the remaining two sides of each block.  Press.

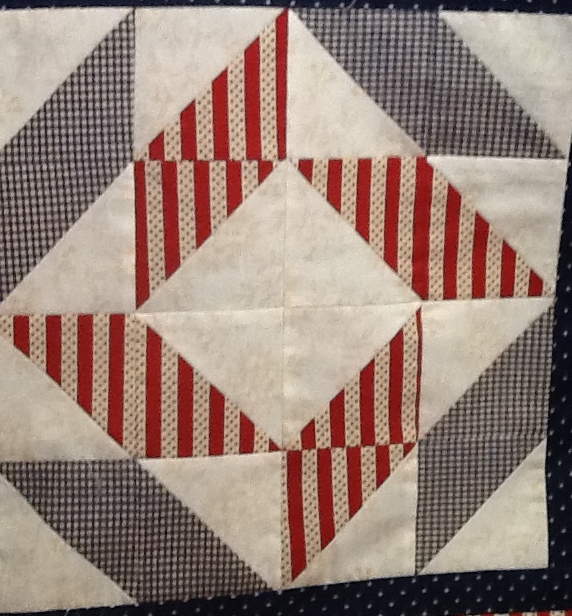
Cut a total of 100) 3 inch squares from the red print.  Draw a diagonal line on the back of 80 of these squares.

Cut a total of 31) 3” x 14½” pieces from the red and cream stripe. 

Place a 3” red square on the end of a 3” x 14 ½” red and cream stripe as diagrammed.  Make sure the right sides of the fabric face each other.


Sew on the diagonal line and trim ¼ inch from the line.  Press back.

Repeat on the opposite end of the red and cream stripe.


Pay close attention to the direction of the diagonal lines to make sure all of the stars points are completed correctly.  Complete 31 star point sashing strips. 

Arrange the completed blocks to create four rows with three blocks in each row.  Sew a star- point/sashing strip between each block and to both ends of the rows.


To create the sashing rows lay three star-point/sashing strips end to end.  Sew a 3” red square
between each of the strips and to each end of the row.  


Create 5 sashing rows.  Sew one between each of the block rows and to the top and bottom of the quilt being careful to align the pieces so the stars join correctly at the intersections.

Create the border by cutting 14)6” x 17” rectangles and 4)6” x 8½” rectangles from the blue fabric.

Lay a blue rectangle in a horizontal position in front of you.  Place a 3” square on the top, right corner of the rectangle with the outside edges aligned, right sides facing and the diagonal line positioned as in the diagram.


Sew on the diagonal line.  Trim ¼” from the sewn line and press.  Repeat using all of the 6 x 17” rectangles and the 6 x 8½” rectangles.

Create the side borders by sewing an 8½” rectangle to the end of a 17” rectangle.  Sew 3 more 17” rectangles to the end of this unit making sure the star points are positioned correctly.  Create two.
                                                                                                                                   
Create the top and bottom borders the same way but only using three 17” rectangles in each set.

Pin the right side border in place making sure the star points are properly aligned.  You will have about 5¾” of the blue border protruding past the top of the quilt.  Begin stitching a little past the first star point (at the top of the quilt) and sew down the side to the end of the quilt.  Sew on the bottom border.  Sew the other side side border.  Finish by sewing the top border.  After the top border has been sewn, finish sewing the first border to the quilt.

The finished quilt should measure 63 1/2 x 80 inches.

Quilt as desired.  Bind and enjoy!


Friday, January 6, 2017

Buck a block (block 12)

The last block!

For block 12 you will use:
8) 4" background squares
8) 4" assorted prints


Draw a diagonal line on the back of the 4" background squares.


Match each of the assorted prints with a background square with the outside edges aligned and the right sides facing.

Sew 1/4 inch on each side of the drawn lines.

Cut on the line.

Square to 3 1/2" and trim the corners from each end of the seam to eliminate bulk.

Press toward the darker fabrics.

Use the photo at the top of the page to arrange and sew the half square triangles to create the block.


We are finalizing the finishing instructions and will make them available as soon as they are ready.

Thanks so much for participating in our Buck-a-block quilt.  Hope you have enjoyed.  We are planning to start another one the beginning of February so stay tuned.  We would love to have you join us again.

Friday, December 2, 2016

Buck a Block (Block 11)

For block 11 you will use:
4) 4" background squares
4) 3 1/2" background squares
4) 4" red squares
4) 4" blue squares


Draw a diagonal line on the back of the 4" background squares.

Draw a diagonal line on two of the red squares.

Match the two red squares with 2 blue squares.

Match the remaining two red and the remaining two blue with the four 4" background squares.
 
Sew 1/4 inch on each side of the drawn lines.

Cut on the line.

Square to 3 1/2" and trim the corners from each end of the seam to eliminate bulk.

Press toward the darker fabrics.

Use the photo at the top of the page to arrange and sew the half square triangles and the 3 1/2 inch background squares to create the block.

Friday, November 4, 2016

Saturday Sampler Block 10


For block 10 you will use:
6) 4" background squares
2) 3" background squares
1) 2 1/2" background square
6) 4" red squares
2) 3" blue squares
4) 2 1/2" blue squares.


As you will notice, the stripes on the flag are created with half square triangles.

Draw a diagonal line on the back of the 4" background squares.

Match the six red squares with the six background squares, right sides together and the outside edges aligned.

Sew 1/4 inch on each side of the line.

 Cut on the line.

Square to 3 1/2" and trim the corners from each end of the seam to eliminate bulk.

Press toward the red fabric.  Set the 12 half square triangles aside while you create the star.

Draw a diagonal line on the back of the 2) 3" background squares.  Match (right sides together, outside edges aligned) with the 2) 3" blue squares. 

Sew 1/4 inch on each side of the line.

Cut on the line.  Square to 2 1/2".

 Use the photo below as a placement guide to create the corner star.  You will use the four half square triangles just created, the four 2 1/2" blue squares and the 2 1/2" background square.


Use the photo at the top of page to arrange the red and tan half square triangles with the star in the corner to create the block.

Wednesday, September 28, 2016

Saturday Sampler block 9

For block 9 you will use:
8) 4" background squares
8) 4" blue squares

Draw a diagonal line on the back of the background squares.

Match the eight blue squares with the eight background squares with the squares right sides together and the outside edges aligned.

Sew 1/4 inch on each side of the line.


Cut on the line.

Square to 3 1/2" and trim the corners from each end of the seam to eliminate bulk.

Press toward the blue fabric.

Use the photo at the top of page to arrange and sew the half square triangles to create the block.


Join us for Shop Hop next Wednesday through Saturday (Oct. 5-8).  There will be lots of wonderful ideas, fun, food and prizes.  More details at beehiveshophop.com

Friday, September 2, 2016

Saturday Sampler (Block 8)


For block 8 you will use:
8) 4" background squares
4) 4" red stripe squares
4) 4" blue check squares


Draw a diagonal line on the back of the background squares.

Match the four red squares with four background squares.

Match the four blue squares with the remaining four background squares.

Place the squares right sides together with the outside edges aligned.

Sew 1/4 inch on each side of the line.

Cut on the line.

Square to 3 1/2" and trim the corners from each end of the seam to eliminate bulk.

Press toward the darker fabrics.

Use the photo at the top of page to arrange and sew the half square triangles to create the block.

Saturday, August 6, 2016

Saturday Sampler (block 7)


For block 7 you will use:
8) 4" background squares
4) 4" red squares
4) 4" blue squares


Draw a diagonal line on the back of the background squares.

Match the four red squares with four background squares.

Match the four blue squares with the remaining four background squares.

Place the squares right sides together with the outside edges aligned.

Sew 1/4 inch on each side of the line.

Cut on the line.

Square to 3 1/2" and trim the corners from each end of the seam to eliminate bulk.

Press toward the darker fabrics.

Use the photo above to arrange and sew the half square triangles to create the block.

Friday, July 1, 2016

Saturday Sampler (block 6)

Block 6

For block 6 you will need:
4) 4" cream/tan squares
4) 4"cream squares
4) 4" red squares
4) 4" blue squares


Draw a diagonal line on the back of the cream and cream/tan squares.

Match the four red squares with cream squares.

Match the four blue squares with cream/tan squares.

Place the squares right sides together with the outside edges aligned.

Sew 1/4 inch on each side of the line.

Cut on the line.

Square to 3 1/2" and trim the corners from each end of the seam to eliminate bulk.

Press toward the darker fabrics.

Use the photo at the top to arrange and sew the half square triangles to create the pinwheels.

Saturday, June 4, 2016

Saturday Sampler (block 5)

Block 5
For block 5 you will need:
4) 4" background squares
2) 4" red squares
4) 3 1/2" red squares
2) 4" blue squares
4) 3 1/2" blue squares

Draw a diagonal line on the back of all four background squares.

Match the two red squares with 2 of the background squares.

Match the two blue squares with two background squares.

Place the squares right sides together with the outside edges aligned.

Sew 1/4 inch on each side of the line.

Cut on the line.

Square to 3 1/2" and trim the corners from each end of the seam to eliminate bulk.

Press toward the darker fabrics.

Use the photo at the top to arrange and sew the half square triangles and 3 1/2" squares to form the block.

Wednesday, May 4, 2016

Saturday Sampler (block 4)


Block 4


For block 4 you will need:
8) 4" background squares
4) 4" red check squares
4) 4" red fireworks squares


Draw a diagonal line on the back of all eight background squares. 

Match the four red fireworks squares with four of the lighter background squares. 

Match the four red check squares with four lighter background squares.

Place the squares right sides together with the outside edges aligned. 

Sew 1/4 inch on each side of the line. 

Cut on the line.

Square to 3 1/2 inches and trim the corners from each end of the seam to eliminate bulk.

Press toward the darker fabrics. 

Use the photo above to arrange and sew the half square triangles to form the block.


Monday, March 28, 2016

Saturday Sampler (Block 3)

 Block 3

For block 3 you will need:

8) 4" light (background) squares
4) 4" red squares
4) 4" blue squares

Draw a diagonal line on the back of all of the light squares.

Match the four red squares with 4 of the light squares making sure the right sides of the fabric are facing and the outside edges are aligned.  Match the four blue squares with the remaining light squares.


Sew 1/4 inch on both sides of the line and then cut on the diagonal line.  Square each of the resulting 1/2 square triangles to 3 1/2 inches.  Press toward the darker fabric.  Arrange as in the photo at the top of the tutorial and sew the squares together to create the block.


Saturday, March 5, 2016

Saturday Sampler (Block 2) at Morganson's

Welcome to block number 2.  As with most of the blocks in the series, this block is created with 3 1/2 inch half-square triangle patches.


 You will need:
4) 3 1/2 inch background squares (block corners)
4) 4 inch background squares
4) 4 inch blue squares
2) 3 1/2 inch red
1) 4 inch red
1) 4 inch tan check

Match the 4) 4" background squares with the 4) 4" blue squares with the right sides together and the outside edges aligned.

Do the same with the 4" red and tan squares.

Follow the method described in block one instructions to create 8 blue/background triangle squares and 2 red/tan triangle squares. Square the blocks to 3 1/2 inches.

Use the photo of the block above to lay out the patches and sew together.

Yeah, block two is done!

Becky has been working extra hard this past week to get all of the blocks designed.  Not only did she finish all of her blocks but she got them sashed and bordered to finish the quilt top.

We love the way it turned out.  It ended up about 63 1/2" x 80".


Okay - here's the sales pitch.  If you would like to finish your quilt like ours, we need to know as soon as possible so we can order more fabric if needed. 

The finishing kits for the twelve block quilt that you see it will be $41.25.  If you are planning a queen size quilt you will need 25 blocks.  Finishing kit (about 96" x 96") will be $69.13.

Give us a call soon so we can get the fabric ordered (801-465-9133). 


Saturday, February 6, 2016

Saturday Sampler (Block 1) at Morgansons

Welcome to the first block of our Saturday Sampler.  We would love to see all of the variations you are working on.  Please send us photos of your progress.

Remember, if you like our version - you can purchase the kits for only $1.00 per block.  They will be available the first Saturday of each month.  Please sign up so we can make sure to cut enough for everyone.

Those of you who did last month's mystery quilt will recognize the block we are doing this month.

Jan. mystery quilt block
Block 1 - Morganson's Saturday Sampler
It is a fun and simple block to complete.  You will need:
6) 4 inch squares of background,
6) 4 inch squares of red
4) 4 inch squares of blue.
Match, with right sides together and outer edges aligned:
2 red squares with 2 blue squares,
2 blue squares with 2 background squares
4 red squares with 4 background squares

Draw a diagonal line on the back of one of the squares in each set.
Sew 1/4 inch on each side of the drawn line.
We should have used a color thread but if you look real close, you can see the stitching.

Cut on the line.

Use the 6 1/2 inch triangle square up ruler (Quilt in a Day) to square the blocks to 3 1/2 inches.  (Make sure the 3 1/2 inch mark on the ruler is placed on the stitching line of the half square triangle patch.)

Trim the excess corners.

Press open.

Repeat using all of the matched 4 inch squares.

Arrange the patches as in the block below.


Sew the patches into four rows.  Press the seams in opposite directions from row to row.  This helps the seams nest together resulting in precise corner placement. 

Thanks so much for participating.  We hope you enjoy the journey with us throughout the year.  We would love to hear your comments and ideas. 


We will be starting our regular bi-weekly block party the first part of March.  Becky is designing a Payson temple memorial wall hanging.  Here is a sneak peek of the work in progress.

The temple is almost finished.  The plan is to use six inch sampler blocks around the temple.  Schedule and cost will be worked out soon.  Please call us at 801-465-9133 if you would like to participate.