Pages

Tuesday, August 28, 2012

Farmland


Wow!  It's been quite a month!  Our daughter's wedding was last Thursday (Doesn't she make a pretty picture?). The wedding day worked out perfectly but put us a little behind on other projects.  We'll post some more photos as soon as we get them from the photographer.


Becky finally sewed the borders on the mystery quilt this morning just in the nick of time.  Here we go with the tutorial.

We'll start with the churndash blocks.


Place two 4 x 8 inch rectangles right sides together with the outside edges aligned.  Draw a diagonal line from the top corner to the middle bottom point.  Draw another diagonal line from the remaining top corner to the bottom middle.  Sew ¼ inch on both sides of the lines.  Cut apart down the middle and on each diagonal line. 


Square the resulting block to 3 ½ inches.  (Quilt in a day triangle square up ruler works well for this.)  Trim the excess seam points and press toward the darker fabric. 

Sew two contrasting 2 x 3 1/2 inch rectangles along the length to complete four rail units as shown below.


Assemble the components as shown below.  
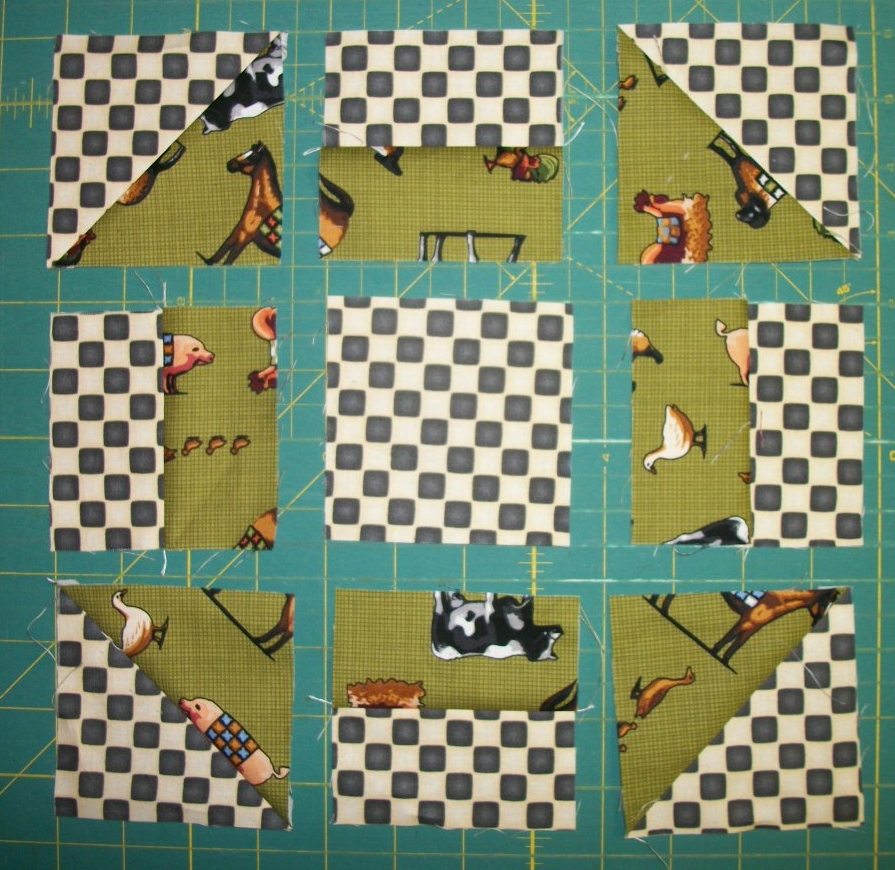


Repeat with different fabrics to create a total of four blocks.
 

From leftover fabrics cut 3) 1 ½ x 9 ½ inch strips (we used the orange small print).  Sew these between the four churn dash blocks to form a row. 


Next we'll work on the star blocks.

You can create the star points using half square triangles or flying geese.  If you have the 3 x 6 flying geese ruler by Quilt in a Day, follow the instructions to create four 3 x 6 (finished size) flying geese units. 

Place the two 8 inch squares right sides together with the outside edges aligned.  On the back of one the fabrics draw two diagonal lines. 


 Sew ¼ inch on each side of both lines.  Cut down the center vertically and horizontally as well as on the drawn diagonal lines. 
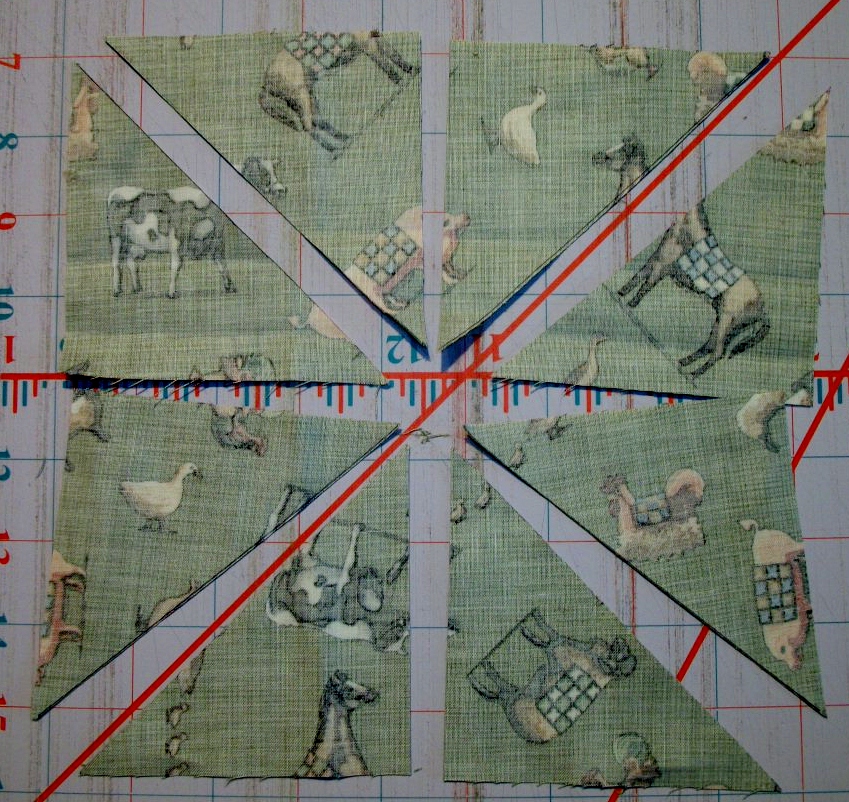


Trim each half square triangle to measure 3 ½ inches.  Trim excess seam points and press.                            

Assemble the components as in star block below.   


 Repeat with different fabric combinations to create a total of four star blocks. 

From leftover fabrics (we used the maroon) cut 3) 1½ x 12½ inch strips.  Sew these between the four star blocks to form a row. 


Measure the length of the star row.  (It should measure 51 ½ inches long.)  Cut the green background fabric 21 x 51 ½ inches.  (Adjust the length to fit the star row if needed.)  Sew the star row to the left side of the green background.  

From the green background, cut a piece 9 ½ x 12 ½ inches.  (Adjust length to fit your quilt if different.)  Sew to the top of the churn dash row.  Sew the churn dash unit to the right side of the green background section.

From the black and white check cut 4) 2 inch bias strips from the longest section of the fabric.  Use the remaining corner sections for the leaves. 


Sew the four bias strips together end to end.  Place as desired on the background fabric and stitch in place. 

 Cut the leaves and petals and place as desired.  Use a little Elmer's washable school glue to hold in place.  Stitch about 1/4 inch from the edges to secure.  (We used a raw edge appliqué.  Use the method you prefer.)

 Cut the first border (green) 2 ½ inches.  Sew to quilt.

 Second border (check) is cut 1 ½ inches.  Sew to quilt.

 Final border is cut 6 inches.  Sew to quilt.


Quilt as desired.  Bind and enjoy! 


Look at the fabrics for the September mystery quilt!


Give us a call at 801-465-9133 to reserve your space! 

Saturday, August 11, 2012

We started our new block party (Letters to my daughter) today.  Here is a photo of the first block. 


"Little Paws"


We still have a few openings if you would like to join in.  Give us a call at 801-465-9133.


Tuesday, July 31, 2012

Criss - Cross Connections tutorial

Wow, the months are speeding by.  It seems we just barely posted last month's mystery quilt tutorial. 
Well, here comes some more fun!

Begin by sewing the borders to the 8 inch blocks.


Draw a diagonal line on the back of each of the 2 inch star point squares.  Place one (right sides together) on the corner of a 3 ½ x 11 inch sashing rectangle.  Sew on the drawn line and press back.  Repeat on all four corners of each of the sashing rectangles. 


Create the rows by sewing a sashing unit between three of the blocks and to each end of the resulting row.  Create three rows. 


Sew a 3 ½ inch star center between three of the sashing units and one to each end.  Create four of these rows.


Sew a sashing row in between each of the three block rows and to the top and bottom of the quilt.


Sew a 1 ½ inch brown first border to the top and bottom of the quilt.  Add the 5 inch stripe border fabric to the top and bottom only.  Sew a 1 ½ inch brown first border all the way around the quilt.


 Finish with the 5 ¾ inch final border.

Quilt as desired.  Bind and enjoy!


The finished quilt.  - The colors are nuch better in real life.  We are still working on this photography thing.


Here are some of the fabrics for August's mystery quilt.


They are from the Country Harvest line, by Eric Dowdle.


Friday, July 13, 2012

New block party begins Aug. 11

We finally found fabrics to get started on the next block party!  Here is a peek.....

Becky finished the first block the other night.  It feels good to have it started.  We were pleased with the way it turned out.  What do you think?


We have a daughter getting married next month.  With wedding on the brains we wonder if we have successfully taught her and helped her learn all the skills she will need to be happy and successful in life.  We hope so.  We pass along these musings only because they are the inspiration behind this quilt.  It will be called "Letters to my daughter".  Each block will represent some practical advice for life as she moves into the wonderful phase of independence and rearing a family of her own.  A letter with practical advice and counsel will accompany each of the blocks.

We may offer the quilt in two different color ways if we can find more fabric to our liking.  (Stay tuned.)

Anyway, the block party will begin Aug. 11th.  We are now reserving spaces.  The sign up fee is only $15.00 and then $2.00 per session.  Each session will include fabric for two nine inch blocks.  Right now, the plan is for 24 blocks total.  You will be able to set the blocks however you like.  We will have setting kits available for an additional fee if you like the way Becky finishes hers.


Call us at 801-465-9133 to reserve your spot today.

Tuesday, June 26, 2012

Garden Stars tutorial

Draw a diagonal line on the back of the 2 inch (print 2) squares.  Place a two inch square on each corner of the 5 1/2 inch center (print 1) fabric.  Sew on the line.


Trim 1/4 inch from the stitching line.


Press all of the triangles back.


The center square is done.  Not too hard so far.

Next we are going to create some flying geese blocks.  We will be using a method that creates very little waste.

Lay two (print 2) 3 1/2 inch squares on opposite corners of a 6 1/2 inch (print 3) square as in the photo below.  Make sure the right sides of the fabric are together.


One corner of the two small squares will overlap each other slightly. 

Draw a diagonal line through both squares.  Sew 1/4 inch on both sides of the line.  Cut apart on the line.


Press toward the smaller triangles.


Place a (print 2) 3 1/2 inch square on the large  corner of each of the resulting pieces with the right sides facing.


As seen above, draw a diagonal line through the square and sew 1/4 inch on each side of the line.


Cut apart on the line.


Press the triangles back and wa la!  Four flying geese.


It is important to square them up to 3" x 5 1/2".  Quilt in a Day makes a 2 1/2" x 5" (finished size) flying geese ruler which is very handy.  If you do not have access to one make sure you leave 1/4 inch from the tip of the geese to the edge of the block.  This will help avoid having flat nosed geese when you sew the blocks together.

Repeat the process using a 6 1/2 inch background block and four (print 3) 3 1/2 inch squares.


You now have all of the components to complete a block.  Lay the pieces out as in the photo below.  Sew them together one row at a time.  If you press the seams in opposite directions from row to row it will make it easier to line up the seams perfectly.


Repeat the process to create a total of nine blocks.  Keep in mind that prints 1,2 and 3 will be different in each block. 

Arrange the blocks in three rows with three blocks in each row.  Sew a   15 1/2" sashing strip between each block in the rows and on the end of each row.


Sew 3) 15 1/2"  sashing strips between 4 brown stripe squares.

Create four of these rows.  Sew between the block rows and to the top and bottom to the quilt.


To create the final borders sew a brown stripe square to each end of the 10 1/2" sashing strips.  Sew a 3" background square between 3 of these units and to each end.  Create four of these rows.


Sew one of these strips to each side of the quilt, being careful to match the seams.


Sew a brown stripe square to both ends of the remaining two strip sets.


Sew one to the top and bottom of the quilt.


It was a particularly busy month, so I didn't have time to get it quilted.  I am really pleased with the way it turned out though.  If you like a longer quilt, you could easily add borders to the top and bottom.  In fact, I think I will.  And scallop them.

Thanks so much for participating in our mystery quilt program.  Please tell your friends about it!

Here are some of the fabrics we will be using for the July mystery quilt.


Give us a call to sign up.  801-465-9133      Happy Quilting!


Friday, June 15, 2012

Beehive Buzz free block pattern

Here is the block Becky created as our shop's free pattern for the beehive buzz.  She liked it so well she is actually considering repeating the block to make a quilt.  We'll see...


Anyway,  we think it is kind of fun framed up. 

Stop by and pick up your free pattern.  We also have a few frames left.  They are only $21.95 but we're offering 10% off during shop hop.

Wednesday, June 13, 2012

Busy busy beehive buzz

We have been busy preparing for the beehive buzz.  We finally got the shop back in shape last night about 7:30.  We had a great crowd awaiting this morning when we opened.  Thanks everyone for showing up!


We ran across a fun and quick idea from the folks at Quiltsmart the other day.  Little tea light lamps.  The shades make up really quick (about 10 minutes each).  You just place the shade over a wine glass and insert a battery operated tea light.


We added the trim to the bottom.  You could go crazy with all kinds of embellishments. 

Our daughter is planning her wedding and reception for this fall.  We're thinking some version of these little treats will become part of the decorations somewhere.


Shop Hop will be going on through Saturday the 16th.  Stop in for a cookie and a demo.  Enter to win a $100.00 gift certificate.   Everything in the shop is on sale!