We are posting a photo of the July Mystery quilt for your reference. The quilt ended up measuring about 67" x 86" so it is the largest quilt we have done in a while. Perfect for your favorite little one.
Oh, and don't forget the matching pillow case.
The August mystery fabrics are on their way. We will post them as soon as we get them in so check back.
Tuesday, July 25, 2017
Saturday, July 8, 2017
Oops - we made some mistakes
If you are working on the "Bee Haven" block party quilt we need to notify you of a couple of corrections.
1. Session Five - the beehive
The cutting instructions on the 2nd row should read:
2nd row - 2) 3" x 6 3/4", (not 6 1/2")
2. Session Six - if you have picked up your kit you need to know we miscalculated the gray honeycomb fabric. There was not enough included in the kit. Please stop by at your convenience and we will have the additional fabric for you.
(For those who have not picked up the kits yet we will have the fabric added.)
So sorry for any inconvenience this may have caused.
Thanks,
Kelly & Becky
1. Session Five - the beehive
The cutting instructions on the 2nd row should read:
2nd row - 2) 3" x 6 3/4", (not 6 1/2")
2. Session Six - if you have picked up your kit you need to know we miscalculated the gray honeycomb fabric. There was not enough included in the kit. Please stop by at your convenience and we will have the additional fabric for you.
(For those who have not picked up the kits yet we will have the fabric added.)
So sorry for any inconvenience this may have caused.
Thanks,
Kelly & Becky
Friday, July 7, 2017
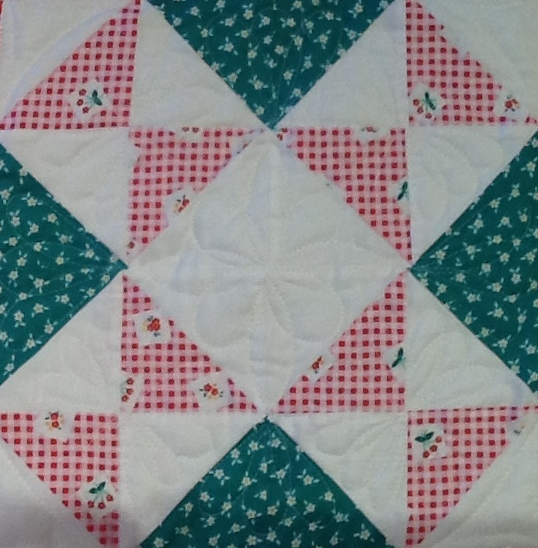
Second Saturday Sampler block 5
For this block you will need:
8) white 4" squares
4) red 4" squares
4) green 4" squares
Draw a diagonal line on the back of all eight of the white (4”)
squares.
Place all of the print squares, right sides together and outside edges
aligned, with a 4” white square. Sew ¼ inch
on each side of the drawn lines. Cut apart on
the line. Square to 3½ inches and press
open.
Use the photo above as a placement guide to arrange the patches.
Sew the squares together to form the block.
Wednesday, June 28, 2017
June mystery quilt
This month's quilt was inspired by another block we recently completed for our "Bee Haven" block party quilt.
We loved the way it turned out and decided it would be fun to see in different colors.
And it was fun to see!
The pattern calls for top and bottom borders of white. We didn't add them for the photo because we plan to enlarge the quilt to twin size.
The quilt is not difficult to make but it did take a little more time to complete than some of our monthly mystery quilts. So we are going to walk you through the blossom making process. It is really just a dresden plate in two colors.
First - sew the 3 1/4 inch print strip to a 3 1/4 inch red strip.
Create a template using the diagram included with the pattern. Carefully cut the wedges alternating the direction of the template. You will need 32 wedges for each blossom. Your kit includes an extra print square to create the 32nd wedge. Make sure you have 16 of each direction to complete the blossom properly.
Fold the wedges in half along the length with the right sides facing. Sew 1/4 inch along the wider end.
Snip the corner to eliminate bulk.
Turn the wedge inside out, making sure the corner is completely turned to properly complete the point.
Press and sew the wedges together. It is important to use an accurate 1/4 inch seam allowance so the completed blossoms lie flat. (A little bit of Best Press or other spray starch may come in handy.) Make sure the print and red sections alternate properly.
Use a little dab of washable school glue on each tip to hold in place on the background square. Stitch to secure. Applique the circle in the center to finish the block. Create 9 blocks.
We used pre-printed squares for the sashing strips. Make sure you cut exactly between the rows of squares from selvedge to selvedge.
Follow the instructions in the pattern to complete the quilt.
Join us next month for a little puppy love.
These are a few of the fabrics we will be using. Others will be added.
Give us a call -801-465-9133.
We loved the way it turned out and decided it would be fun to see in different colors.
And it was fun to see!
The pattern calls for top and bottom borders of white. We didn't add them for the photo because we plan to enlarge the quilt to twin size.
The quilt is not difficult to make but it did take a little more time to complete than some of our monthly mystery quilts. So we are going to walk you through the blossom making process. It is really just a dresden plate in two colors.
First - sew the 3 1/4 inch print strip to a 3 1/4 inch red strip.
Create a template using the diagram included with the pattern. Carefully cut the wedges alternating the direction of the template. You will need 32 wedges for each blossom. Your kit includes an extra print square to create the 32nd wedge. Make sure you have 16 of each direction to complete the blossom properly.
Fold the wedges in half along the length with the right sides facing. Sew 1/4 inch along the wider end.
Snip the corner to eliminate bulk.
Turn the wedge inside out, making sure the corner is completely turned to properly complete the point.
Press and sew the wedges together. It is important to use an accurate 1/4 inch seam allowance so the completed blossoms lie flat. (A little bit of Best Press or other spray starch may come in handy.) Make sure the print and red sections alternate properly.
Use a little dab of washable school glue on each tip to hold in place on the background square. Stitch to secure. Applique the circle in the center to finish the block. Create 9 blocks.
We used pre-printed squares for the sashing strips. Make sure you cut exactly between the rows of squares from selvedge to selvedge.
Follow the instructions in the pattern to complete the quilt.
Join us next month for a little puppy love.
These are a few of the fabrics we will be using. Others will be added.
Give us a call -801-465-9133.
Thursday, June 8, 2017
Second Saturday Sampler block 4
For this block you will need:
8) white 4" squares
4) brown 4" squares
2) yellow 4" squares
2) red 4" squares
Draw a diagonal line on the back of all eight of the white (4”)
squares.
Place all of the print squares, right sides together and outside edges
aligned, with a 4” white square. Sew ¼ inch
on each side of the drawn lines. Cut apart on
the line. Square to 3½ inches and press
open.
Use the photo above as a placement guide to arrange the patches.
Sew the squares together to form the block.
Tuesday, May 30, 2017
May Mystery
We call it "Home Tweet Home".
We liked it so much we made another version in different fabrics and added a little applique in preparation for the Beehive Buzz which starts tomorrow.
The theme for this year's Summer Buzz is "Splish Splash". Becky created a cute little baby quilt which will be our shop's free pattern. Come and get one. The Summer Buzz will be Wednesday through Saturday with fun food and prizes. Come see us.
| Just Ducky |
Monday, May 15, 2017
Second Saturday Sampler block 3
To create this block you will need:
2) 4” red squares
2) 4” pink squares
2) 4" green squares2) 4"yellow squares
and
8) 4” white squares
Draw a diagonal line on the back of all eight of the white (4”)
squares.
Place all of the print squares, right sides together and outside edges
aligned, with a 4” white square. Sew ¼ inch
on each side of the drawn lines. Cut apart on
the line. Square to 3½ inches and press
open.
Use the photo above as a placement guide to arrange the patches.
Sew the squares together to form the block.
Subscribe to:
Posts (Atom)