Before we get into the mystery quilt we want to remind you that tomorrow (Jan. 3) is our fabulous five fifty five first Friday sale. All designated fabrics are only $5.55 per yard. As you know, it is a great way to build your stash or purchase backing fabric. We have added some terrific outdoor flannels to the shelves for the sale.
A little side note - our furnace has gone out and we are hoping it will be repaired today but dress warmly just in case.
We love the way the December mystery quilt turned out.

As is usual for us, the photo doesn't do justice to the quilt. It is much cuter in real life.
This was a fun quilt to create using a stack and whack method. Because it is a little unusual we have decided to do a step by step tutorial.
The pattern includes a cutting diagram. You will need 21 copies of the heart diagram. (You can trace the diagram on 10 x 10 inch freezer paper if you desire. These can be pressed to the fabric to help keep the pattern from shifting.)
Begin by sorting the 10 inch squares into pairs. Make sure that each pair is comprised of contrasting fabrics.
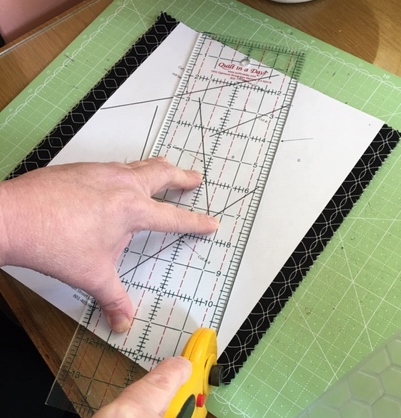
Align the squares with the print side up and the outside edges aligned. Place the cutting diagram on the top of the set with the paper centered (right to left) and the top of the paper aligned with the top of the fabric.

Align a ruler on the line indicating the first cut and cut through the paper and layers of fabric.
Realign the paper and fabrics and continue to cut in the order indicated on the diagram until all of the cuts are completed. Make sure to leave all of the pieces in relative position to make reassembly easier.

Take fabric pieces B and C from the bottom and place them on top. As you can see, one of the fabrics will become the heart and the other print the background of both blocks.

Use an accurate 1/4 inch seam to begin sewing the pieces together. Start by sewing piece A to piece B. Overlap the ends about 1/4 inch to accommodate the seam allowance. Press each seam as it is sewn. (We found a little best press helps tremendously to keep the seams flat and precise.) Trim each unit if needed before adding the next section.

Sew the A/B section to section C. Align so the bottom point of A/B extends about 1/4 inch past section C as seen in the photo below. Press.

Add section D as shown below. Press back.

Sew on section E and press.


You will need to trim the edge of the sewn unit (as seen below) before sewing section F in place.

Section F is sewn to the unit next.

Section G is sewn on last. (You may need to straighten the edge of the sewn unit before attaching G.) We found it best to place this piece so the smallest part of the wedge hangs below the rest of the block. Press back.

Repeat the process to create a total of 42 blocks. Measure the smallest of your blocks and square all of the blocks to that size. We squared our blocks to measure 8 1/4 x 8 1/4 inches.

Follow the directions with your kit to assemble the blocks and add the border.
Hope this helps. Happy Sewing!
No comments:
Post a Comment